When the problem is happening (which is fairly random)...
...I press the single or double button, there is almost no sound, and no water comes from the grouphead. Then I stop it, and press again and the water comes out perfectly. It will alternate like this (no water/water) for several cycles. The hot water tap never seems to fail during these times.
I have had the pressure regulator/gauge out of the line for awhile, so I thought I would hook it back up, and now I think it is faulty. It makes a terrible sound in both the regulator and pump in the machine, so I have removed it for now.
I am feeding the S1 from a 12 gallon RO tank, and pressure seems totally normal based on a visual inspection at my other hookups like the drinking water faucet and the plumbed-in Newco Drip machine.
Maybe this is a common problem that I am just not aware of, since it has been more or less trouble free since day 1.
Any clue as to the problem or where I can start to troubleshoot?
Thanks
Chris
Weird intermittent grouphead failure
-
bbqnut

I occasionally will not hit the button square and it will do something like that but I can't remember the last time it happened. It seems like it was something that mostly happened on the S1, not sure it's ever happened on the VII.
S1 Cafe Admin
http://www.s1cafe.com
http://www.s1cafe.com
-
bbqnut
Thanks for the idea. Pretty sure it is not that since there appears to be a pattern to it.admin wrote:I occasionally will not hit the button square and it will do something like that but I can't remember the last time it happened. It seems like it was something that mostly happened on the S1, not sure it's ever happened on the VII.
I need to get some more scientific data.
-
Niko
-
bbqnut
I will try to get a video with audio later tonight.
In the meantime, let me try to explain some of the behavior and sounds I have been hearing.
Here is a typical scenario:
Machine has been on for several hours with the PF handle locked. Walk up to the machine and...
1. Press the single button (programmed for about 120 seconds):
Very, very low hum (if ear close to top) and no water output
2. Press the single button to stop, and again to start:
All sounds normal, water flows, all seems good.
Repeat the steps above several times with the same exact results. And it can happen with PF in or out.
In some cases step one can be a little different. It starts off the same, but if you wait long enough water will start to flow, but maybe half the volume of normal. Again a quick start stop fixes the problem.
-
Niko
-
Niko
-
bbqnut
Well, normally, depending on usage, I would do a Cafiza backflush and full soak every 1-2 weeks.Niko wrote:OK, Chris.... :D ...confession time, when was the last time you cleaned the machine with Cafiza???
It has probably been about 6 weeks, but I have used it very, very little in the last 6 weeks. Turned on maybe 5 times, and pulled maybe 10-15 shots.
Am I still in trouble?
-
bbqnut
-
Niko
-
bbqnut
-
Niko
-
bbqnut
OK, I did a very thorough double run of Cafiza a couple days ago. Everything seemed fine. Shots were pulling fine.
This morning I loaded up a double, which was ground a little too fine, and a similar problem happened again. Normally in this situation, it sounds like normal, then eventually the 3 lights blink. This time, as soon as I locked in the PF and hit the button, the machine immediately went almost silent (as in the original problem).
Does this give any more clue as to what could be the part giving me angst?
I am mechanically inclined, but know very little about how an espresso machine works. Could it be the 3 way valve sticking? Should I do a 3rd Cafiza? Leave the Cafiza in there longer before flushing?
Thanks
Chris
-
Niko
How long are you leaving the Cafiza in there between the flushes?
Try 5 solid flushes with at least a minute between the intervals.
No harm in doing one more iteration of Cafiza, too much is not good either but in your case it sounds like a sticking valve that can use another dose.
Are you following through with another 5 blank (water) backflushes to get rid of the detergent, I'm sure you have but I'm just asking anyways... :D
To make a long story short,
I had a similar (sticking) valve situation and it didn't get cleared for a couple of weeks after 3 Cafiza runs.
I've stayed away from super oily beans after that.
-
bbqnut
I have been doing a single dose of Cafiza (from the little spoon on the Pallo tool).Niko wrote:How long are you leaving the Cafiza in there between the flushes?
Try 5 solid flushes with at least a minute between the intervals.
No harm in doing one more iteration of Cafiza, too much is not good either but in your case it sounds like a sticking valve that can use another dose.
Are you following through with another 5 blank (water) backflushes to get rid of the detergent, I'm sure you have but I'm just asking anyways... :D
To make a long story short,
I had a similar (sticking) valve situation and it didn't get cleared for a couple of weeks after 3 Cafiza runs.
I've stayed away from super oily beans after that.
I typically let it sit for about 30 seconds, and do it about 5-7 times, then another 5-7 with plain water.
I did this process twice the day I decided to clean it. I will say that when you pull the PF out after the first round, typically there is some brown or grounds. This time, it is was very, very brown. It could just need another backflush or two over the next week.
I think I will give it another go, and let the Cafiza sit in there a little longer each time. I think it just needs more time to eat away the gunk and oil. Or at least that is my hope.
And I had a spat of over-roasted beans as of late (thanks to the iRoast, and my lack of attention), so that, combined with the 6 week hiatus on backflushing...
-
Niko
-
bbqnut
-
bbqnut
OK still have the problem, but very infrequently.
So today I decided to do a plain water backflush (which so far hasn't solved the problem). But I let the 3 lights blink a little longer than usual, and when I stopped the water, I heard a chirp accompanied with the normal force of water in the drip tray. Then the problem came back worse than ever, but only for a few pulls of water, then it disappeared.
Anyone know what the chirp is? Are we still talking about a 3-way valve sticking? If one last Cafiza flush doesn't make the problem go away, is there any way to take it apart and clean it manually (whatever the problem part is)?
Thanks
Chris
-
Niko
-
bbqnut
Here is the YouTube Version. Crank the volume to hear what it is doing.
http://www.youtube.com/watch?v=eNptmjDwr4Q
http://www.youtube.com/watch?v=eNptmjDwr4Q
-
Niko
W=O=W!! 
Now that's a BIG TIME delay in that blank shot.
I'm starting to suspect something stuck and then clearing away when enough pressure builds to explode free.
A piece of brass shaving or a nice chunk of Teflon tape might cause that.
Wow.
I wouldn't even know where to begin to look with that one, the video nearly knocked me off my seat.
-
bbqnut
So here is the good news - this was happening every other press of the button. With 3 Cafiza backflushes over the last couple weeks, it has almost gone away. So whatever I did, had some effect. It seems to happen when the machine has been on for some time idle, and I walk up and press the button.
I think I will email Chris' Coffee with the video clip tonight, and call them in the morning.
I think I will email Chris' Coffee with the video clip tonight, and call them in the morning.
-
bbqnut
So here is the short story made long - I got a hold of Jason at Chris' coffee - who by the way, is awesome. If you ever have a problem, I will just say to talk to Jason and no one else. I will leave it at that.
He advised more Cafiza backflushes might do the trick, but if not, he would send me some instructions on how to check two likely areas (Group Solenoid or 3-way valve, and the Flow Meter). I had suggested a blockage, and he agreed that it was possible. Well, the Cafiza did not help, so I set out this weekend to check these two items.
First off, I have never used so many different sized metric wrenches in my life. Secondly, while the instructions he sent were excellent, I have some updates that might make it easy for other people, and to avoid some of the mistakes I made. I am going to see if he will allow me to post his instructions here along with his photos. I will likely also post my updates in italics or something.
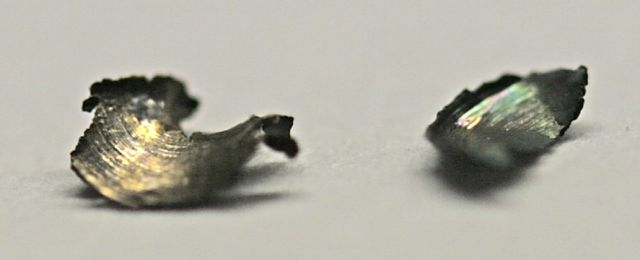
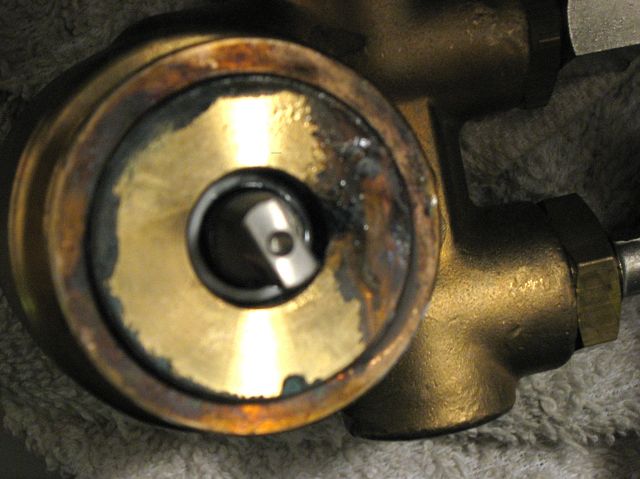
So what did I find? Two brass shavings (a single brass shaving the flow meter, and another in the group solenoid).
I think the one in the flow meter was probably not really causing much harm, but the group solenoid orifice is so small, and this brass shaving was almost as big as the orifice. I suspect it would be like a manhole cover. When I found it, the shaving was straight up and down (thus letting maximum water through). Every once in a while it would turn/spin sideways, and almost completely block the orifice, causing my intermittent problem.
Attached is a photo for all to see. I did a macro shot for effect. In reality these were about 1mm or so.
And while the service from Jason was excellent, this debris problem (mostly of brass shavings), seems to be a recurring theme with S1 users. And while physically small, the resultant fix can be quite involved. I think La Spaziale needs to do better flushing at the factory.
Chris
He advised more Cafiza backflushes might do the trick, but if not, he would send me some instructions on how to check two likely areas (Group Solenoid or 3-way valve, and the Flow Meter). I had suggested a blockage, and he agreed that it was possible. Well, the Cafiza did not help, so I set out this weekend to check these two items.
First off, I have never used so many different sized metric wrenches in my life. Secondly, while the instructions he sent were excellent, I have some updates that might make it easy for other people, and to avoid some of the mistakes I made. I am going to see if he will allow me to post his instructions here along with his photos. I will likely also post my updates in italics or something.
So what did I find? Two brass shavings (a single brass shaving the flow meter, and another in the group solenoid).
I think the one in the flow meter was probably not really causing much harm, but the group solenoid orifice is so small, and this brass shaving was almost as big as the orifice. I suspect it would be like a manhole cover. When I found it, the shaving was straight up and down (thus letting maximum water through). Every once in a while it would turn/spin sideways, and almost completely block the orifice, causing my intermittent problem.
Attached is a photo for all to see. I did a macro shot for effect. In reality these were about 1mm or so.
And while the service from Jason was excellent, this debris problem (mostly of brass shavings), seems to be a recurring theme with S1 users. And while physically small, the resultant fix can be quite involved. I think La Spaziale needs to do better flushing at the factory.
Chris
-
Niko
-
bbqnut
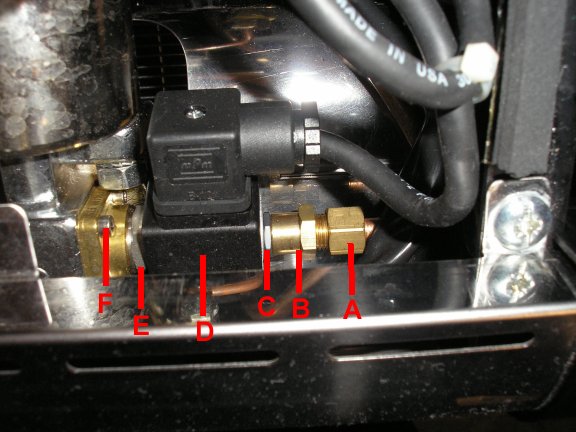
Here are some instructions and photos from Jason at Chris' Coffee. They explain how to take apart the flowmeter, as well as the group solenoid (3-way valve). I have added my own tweaks in italics. I have also adjusted his photo for the flowmeter, since it was off a bit. I had to do some creative editing. Hopefully it is clear enough.
There are 2 locations that would be common places for a blockage to be. I have attached 3 pictures for reference.
Before starting the repair, turn the water off to the machine, activate the drink button for a second to relieve the water pressure, then unplug the machine and let it cool off. It is also a good idea to have a rag under the component you are working on to prevent any other components from getting wet.
Have a very good assortment of Metric sockets and open end wrenches. I think I used several on this machine ranging from 6mm on up to 22mm. A small crescent wrench is a great idea too.
For the group solenoid valve, remove the top cover and you will see the valve to the right of the group assembly.
Also remove the front panel, otherwise, it may be near impossible to get your wrenches and sockets in there. This involves removing the drip tray, the steam knob, and taking off the 4 front inside thumbscrews for the side panels, as well as the two screws that hold the front panel on. This will allow the front panel to drop down (with control board still attached). You now have easy access to the group and related parts. Trust me on this one.
Using the group solenoid valve picture as a reference:
A- Unscrew backflush tube nut
B- Unscrew adaptor
C- Unscrew nut
D- Pull off black coil
E- Unscrew nut at the base of valve and check for a blockage or debris, also make sure the piston inside the valve moves freely
F- Remove metric allen screws and check holes at base of valve and on the group for blockages
When putting the valve back on be sure that the 2 holes in the valve match up to the 2 holes on group body.
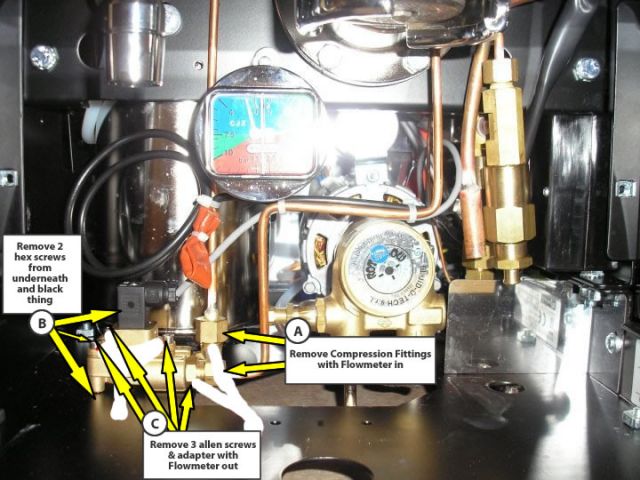
For the flowmeter using the Flowmeter picture as reference:
A- Remove 2 compression fittings.
B- Remove the 2 hex head screws underneath and the black thing.
C- Remove the metric allen screws and the adapter once the flow meter body is out. Inspect for debris and maybe wash everything with good water.
Using the flowmeter breakdown picture you will see the location of 2 screens (Part # 275) which could also be blocked.
Reverse assembly order for everything, and be attentive to very small pieces of debris, so you know whether you have found a problem. I suggest working on a clean white surface.

There are 2 locations that would be common places for a blockage to be. I have attached 3 pictures for reference.
Before starting the repair, turn the water off to the machine, activate the drink button for a second to relieve the water pressure, then unplug the machine and let it cool off. It is also a good idea to have a rag under the component you are working on to prevent any other components from getting wet.
Have a very good assortment of Metric sockets and open end wrenches. I think I used several on this machine ranging from 6mm on up to 22mm. A small crescent wrench is a great idea too.
For the group solenoid valve, remove the top cover and you will see the valve to the right of the group assembly.
Also remove the front panel, otherwise, it may be near impossible to get your wrenches and sockets in there. This involves removing the drip tray, the steam knob, and taking off the 4 front inside thumbscrews for the side panels, as well as the two screws that hold the front panel on. This will allow the front panel to drop down (with control board still attached). You now have easy access to the group and related parts. Trust me on this one.
Using the group solenoid valve picture as a reference:
A- Unscrew backflush tube nut
B- Unscrew adaptor
C- Unscrew nut
D- Pull off black coil
E- Unscrew nut at the base of valve and check for a blockage or debris, also make sure the piston inside the valve moves freely
F- Remove metric allen screws and check holes at base of valve and on the group for blockages
When putting the valve back on be sure that the 2 holes in the valve match up to the 2 holes on group body.
For the flowmeter using the Flowmeter picture as reference:
A- Remove 2 compression fittings.
B- Remove the 2 hex head screws underneath and the black thing.
C- Remove the metric allen screws and the adapter once the flow meter body is out. Inspect for debris and maybe wash everything with good water.
Using the flowmeter breakdown picture you will see the location of 2 screens (Part # 275) which could also be blocked.
Reverse assembly order for everything, and be attentive to very small pieces of debris, so you know whether you have found a problem. I suggest working on a clean white surface.
-
Niko
-
Weska
-
bbqnut
-
bbqnut
-
Niko
-
bbqnut
Well, it won't fail for the last few days. And I don't want to take the motor apart from the pump, hoping day after day it will fail once.Niko wrote:What's the good word, Chris?
Any news...the suspense is killin' me.
...don't make drive down there!
I am not sure what to do, as warranty is running out. I may take it apart and see if the motor turns freely, as Jason suggested, and then go from there. I don't want them to send me all possible parts (pump, motor, capacitor), as that would not be fair, but I don't want this problem coming back one day after the warranty either.
-
Niko
-
bbqnut
Not sure I know exactly what you are asking for, but when it fails, it is still like the original video. Take note of the sound and the gauges:
http://www.youtube.com/watch?v=eNptmjDwr4Q
http://www.youtube.com/watch?v=eNptmjDwr4Q
-
Niko
I mean when the machine is refilling the second boiler (steam), does the pump and motor sound the same to you as if the group is pulling a shot? In other words, go dispense a bunch of water from the spigot into a pitcher and then listen as the machine starts to autofill itself to replenish the lost water, I'm just wondering if it sounds the same?
-
bbqnut
-
Niko
I was trying to rule out the valves since it's a dual boiler machine, each one has it's own...just trying to isolate it.
Sounds like it's what you mentioned earlier, capacitor, motor or pump. But it is kind of odd that the machine sounds different when it's pretty much doing the same thing but rather filling a different boiler, wouldn't you say?
Sounds like it's what you mentioned earlier, capacitor, motor or pump. But it is kind of odd that the machine sounds different when it's pretty much doing the same thing but rather filling a different boiler, wouldn't you say?
-
bbqnut
So there is one motor, one pump. But two boilers (steam and group). So filling each one should sound slightly different, as there are different water paths.Niko wrote:I was trying to rule out the valves since it's a dual boiler machine, each one has it's own...just trying to isolate it.
Sounds like it's what you mentioned earlier, capacitor, motor or pump. But it is kind of odd that the machine sounds different when it's pretty much doing the same thing but rather filling a different boiler, wouldn't you say?
But it is hard to hear the motor or pump, especially when activating the group, since the water flowing there creates a noise that masks everything else somewhat.
-
Niko
-
bbqnut
I was reading elsewhere that if the motor is easy to turn (I will have to take the pump off), then it could be the motor or capacitor. So that will be my next step. Jason also said to check for water at the motor/pump union - not sure what that will show.Niko wrote:I was hoping it was one of the valves, also hoping that if it sounded significantly different it would point something else out.

I hope you figure it out soon, the only other documented pump failure is Bob's S1 up in Toronto.
-
Niko
-
bbqnut
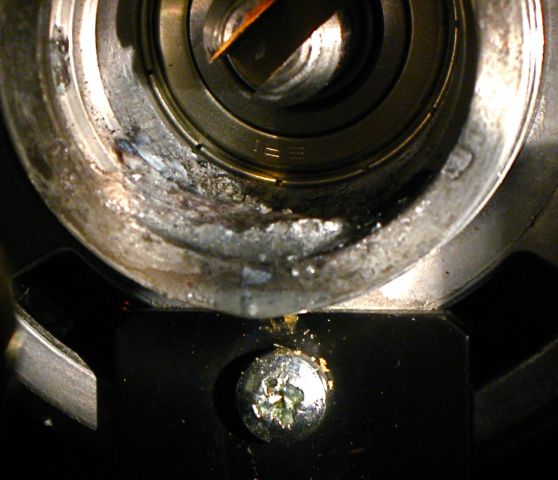
So I got the pump removed from the motor, and here are the results and photos.
The motor turns freely, as does the pump. Not sure what that means, but the photos are interesting. You will see in the motor union, there is this weird gray pasty substance (it dried to a powder once it sat for awhile).
The pump has some water at the shaft, and there is a little corrosion around the brass area as well.
I have an email into Jason at Chris' to see what he thinks.
-
Niko
-
bbqnut
-
bbqnut
Just got the new pump installed, and it is warming up. It sounds a lot different, that much is sure.
And while it would seem trivial replacing the pump, the hardest part was getting the clamp off that holds the pump to the motor. Short stubby screwdriver too short, and other screwdrivers were too long.
Anything I need to adjust for pressure, or does that have nothing to do with the pump?
And while it would seem trivial replacing the pump, the hardest part was getting the clamp off that holds the pump to the motor. Short stubby screwdriver too short, and other screwdrivers were too long.
Anything I need to adjust for pressure, or does that have nothing to do with the pump?
-
bbqnut
I know I should know this, but roughly what should the group pressure be at when idle, and with the shot button engaged? Any difference if I have the PF with coffee locked in?chas wrote:Good question. I would think there might be some pump to pump pressure variation. I would certainly check it.
Right now it is at 2 Bar idle (blue), and 12.5 bar when shot is depressed (red). That is with no PF in.
And lastly, where would I make this adjustment? I am going to start going through the FAQ, so if it is in there, I should find it.
Thanks
-
Niko
If you have a blind basket, the pressure should build up to 9 bars max. When there's a regular basket while pulling a blank through the PF, the pressure is usually about 8 - 8.25 bars.
As far as adjusting the pressure, I know Chas has that listed on one of the pages on the site.
Do you have a blind basket?
I assume a backflushing disk should work too in a pinch.
As far as adjusting the pressure, I know Chas has that listed on one of the pages on the site.
Do you have a blind basket?
I assume a backflushing disk should work too in a pinch.
-
Niko
Video is done....youtube is compressing it as we speak.
One thing I noticed is that the machine definitely has a pre-infusion going on which is clearly shown in the video by the sounds and gauge reading.
UPDATE: damn youtube is sure taking their time with this!
One thing I noticed is that the machine definitely has a pre-infusion going on which is clearly shown in the video by the sounds and gauge reading.
This should work out fine.bbqnut wrote:I only have the disk.
Look forward to the video.
UPDATE: damn youtube is sure taking their time with this!
Last edited by Niko on Sat Oct 27, 2007 5:16 pm, edited 1 time in total.
-
bbqnut
I assume I want to follow these instructions?
http://www.s1cafe.com/s1v2/VII_Expansion.php
http://www.s1cafe.com/s1v2/VII_Expansion.php
-
Niko
-
bbqnut
-
Niko
-
chas
- Vivaldi Dreamer
- Posts: 3058
- Joined: Wed Jun 02, 2004 11:52 pm
- Location: Central Maryland
- Contact:
When you hit 12 bars water should start coming out the expansion valve. If you are getting up to 15 it sounds like you also need to adjust the expansion valve.
Since adjusting the expansion valve screws up the group pressure, the instructions for adjusting the expansion valve also includes instructions for readjusting the group pressure.
Since adjusting the expansion valve screws up the group pressure, the instructions for adjusting the expansion valve also includes instructions for readjusting the group pressure.
Chas
LM GS/3 & LaSpaziale Dream v 1.25 (US 120V)
Mazzer Kony E, Customized Rocky
Hottop P/B
LM GS/3 & LaSpaziale Dream v 1.25 (US 120V)
Mazzer Kony E, Customized Rocky
Hottop P/B
-
bbqnut
OK, I got the expansion valve calibrated for 12.5 bars to drip slowly (though backing off to 12 does not quite stop it). I think it is close enough though.
And I have the gauge looking pretty much like Niko's video, but not quite. Here is the comparison. Maybe you can tell me if there is anything to be concerned with:
Idle
Chris - 2
Niko - 1
Shot No PF
Chris - 8.6
Niko - 8.3
Shot with PF + disk
Chris - 9
Niko - 9
And I have the gauge looking pretty much like Niko's video, but not quite. Here is the comparison. Maybe you can tell me if there is anything to be concerned with:
Idle
Chris - 2
Niko - 1
Shot No PF
Chris - 8.6
Niko - 8.3
Shot with PF + disk
Chris - 9
Niko - 9
-
chas
- Vivaldi Dreamer
- Posts: 3058
- Joined: Wed Jun 02, 2004 11:52 pm
- Location: Central Maryland
- Contact:
When it is idle that should essentially be the line water pressure at the S1. This would either be the real water pressure coming into your house or whatever you set it to if you added a pressure regulator.
My guess is that Niko has a regulator and you don't???
My guess is that Niko has a regulator and you don't???
Chas
LM GS/3 & LaSpaziale Dream v 1.25 (US 120V)
Mazzer Kony E, Customized Rocky
Hottop P/B
LM GS/3 & LaSpaziale Dream v 1.25 (US 120V)
Mazzer Kony E, Customized Rocky
Hottop P/B
-
bbqnut
Have one, but took it out since it was acting up. So yes, you are right.chas wrote:When it is idle that should essentially be the line water pressure at the S1. This would either be the real water pressure coming into your house or whatever you set it to if you added a pressure regulator.
My guess is that Niko has a regulator and you don't???
I think 1 Bar is about 14 PSI, so that sounds right - about 28 PSI from my RO water system with no regulator.
I guess the real place I should check pressure, is when I have coffee in there. I would think it should be between 8.25 and 9 somewhere.
I know on other machines, people really get into changing pressure, and claim the taste can really change. Any of you guys do that, or think it's hype?
-
bbqnut
-
Niko
-
bluesman13
-
Niko
-
bluesman13