Page 1 of 1
Crap - Damaged flowmeter alarm
Posted: Sun Feb 10, 2008 10:58 am
by jmcphail
I've had my LaSpaz for under a month, and all has been sweetness and light.
Last night and this morning I am getting a damaged flowmeter alarm intermittently. It happens during a shot, and it happens when just running the group. And sometimes it doesn't happen at all.
Also last night while pulling a double LaSpaz overflowed my cup while my back was turned! Ever since programming the volumetric double LaSpaz has reliably given me my 2 ounces, so I was pretty surprised. It hasn't done it again, though.
There are already numerous threads about this very issue, and I'm tempted to inspect the flowmeter for debris, but for warranty purposes I'm going to wait until told to by someone from Chris Coffee. The combination of damaged flowmeter alarm and the overflow last night really point to the flowmeter I think.
My solution to the problem last night was to go to bed and hope elves would fix it for me, but they got the day off. So I'll be on the phone early tomorrow apparently.
Sigh.
Posted: Sun Feb 10, 2008 11:06 am
by jmcphail
Whups, I just realized my posts are in the wrong "In Warranty Problems" category, my LaSpaz is a VII.
Posted: Sun Feb 10, 2008 2:17 pm
by cappadoc
You may want to see my post under out of warranty issues if you are using a flojet.
Posted: Sun Feb 10, 2008 2:23 pm
by jmcphail
Mine is plumbed in, but I'll give it a read.
I've had another shot and a Latte for my SO, and no damaged flowmeter alarms.
Posted: Sun Feb 10, 2008 9:21 pm
by Niko
Call Chris' in the AM and they'll tell you what to inspect.
Don't worry, one way or another it'll be solved with or without the elves

Posted: Mon Feb 11, 2008 9:10 am
by jmcphail
Thanks for moving this post, I looked for a way to do it myself and concluded that it was an admin function.
I spoke with CC this morning and did a few diagnostic steps, and I was able to reproduce the problem several times.
Because it's intermittent Tim suspects that it may be the flowmeter "brain" malfunctioning, but he doesn't discount that it could be debris in the flowmeter or at the giceur screens. So he's sending a new impeller and flowmeter "brain", and I'll inspect the screens while I have it open.
I'll post back here with more as it develops. I'm really glad it's a non-blocking alarm and that it happened during the warranty. I'm really, really glad that I won't have to remove those side panels! I tried to get the elves to volunteer for that duty, but they're smarter than that!
Posted: Mon Feb 11, 2008 12:52 pm
by Niko
Excellent
I'm crossing my fingers so you don't have to remove the side panels.
If you you have to, don't worry - you have my sympathy

Glad to hear that CC is sending you some parts, I'm not surprised as usual that they're already on the road to fix your machine.
Posted: Mon Feb 11, 2008 1:45 pm
by jmcphail
Thanks, Niko!
I know I'll need 3mm & 4mm Allen wrenches, and I suspect a number of smallish metric open-end wrenches. All of which are buried in a container somewhere, unopened since 2002 when I moved from Texas.
Has anyone ever put together a LaSpaz recommended tools list?
Posted: Mon Feb 11, 2008 2:07 pm
by Niko
jmcphail wrote:
Has anyone ever put together a LaSpaz recommended tools list?
I've always wanted to do that!
I know Chas has listed some of the tools and sizes on some stuff on this site but it would be nice to have a thread or listing on just this sort of thing.
The steam arm has some crazy size like 22mm

(if I remember correctly, but it may be 20mm?) see, we need a size chart since I can't remember this too.
Posted: Mon Feb 11, 2008 7:22 pm
by jmcphail
I wonder if a vendor would be a good source for the list of tools? Maybe LaSpaziale itself has such a list?
Posted: Mon Feb 11, 2008 7:55 pm
by Niko
I don't think so...
but I could be wrong.
Posted: Mon Feb 11, 2008 7:58 pm
by chas
Here's what I have:
Metric crescent wrench set 9mm-19mm
Individual ones for 20mm, 21mm, 22mm, 23mm, 25mm
You'll eventually need all the individual sizes and many of the sizes from the set. It's cheaper to buy as many as possible in a set even though you won't need them all. I think 10mm is actually the smallest size used on the S1. If you can find a set from 10mm-20mm that would be a better way to start.
SInce I replaced the screen bolt with a hex screw I also bought a set of metric allen wrenches.
With those tools plus a flat and Phillips screwdriver I can disassemble the entire machine.
Posted: Mon Feb 11, 2008 8:26 pm
by jmcphail
Chas, do you remember the thread & pitch of the screen bolt?
This is fantastic information!
Posted: Mon Feb 11, 2008 8:50 pm
by chas
I found this post from January 2005. Thanks to New England Cliff. I guess this isn't what I needed the metric hex key set for. Actually I use a single Allen wrench for the screens. What I found is one at Sears that has a ball shaped end so you can easily unscrew it without requiring that you hold the wrench perfectly perpendicular to the bolt head. It just makes it a little easier.
BTW: I did omit regular pliers and needle nosed pliers as things that will be useful occasionally for some repairs.
I went over to my local hardware store to see what they had today, and found a pretty good replacement. It's a stainless button head socket cap screw, part number 72057, from Midwest Fastener Corporation. The size is 10-32x3/4". It's maybe a millimeter shorter than the stock screw, which is 2cm long, but you still have plenty of thread. They're driven by a 1/8" allen wrench which is very easy to use under the group. The profile is much lower. It barely extends below the recessed area of the screen. You could probably grind it down a little more, but it's great just the way it is. It has a gently rounded head that tapers right down to the screen so it may prevent channeling in that area.
Posted: Mon Feb 11, 2008 9:01 pm
by bbqnut
I had brass shaving debris in my flowmeter.
Try to wade through this thread and find the photos of what I found:
http://www.s1cafe.com/viewtopic.php?t=519
Posted: Mon Feb 11, 2008 9:09 pm
by chas
That's always what it is. I don't think anyone reporting this problem has actually ended up with a flowmeter that was bad.
I don't know whether it's LaSpaziale or one of their vendors that cause the shavings but LaSpaziale ought to take more pains to flush out the boilers and fittings prior to final assembly. Almost all the shavings issues are on the steam boiler side of the plumbing rather than the group side.
Posted: Mon Feb 11, 2008 9:18 pm
by jmcphail
bbqnut, I saw your post ( and others ) earlier and was tempted to just open it up and find the source of the problem, but decided to wait to talk to CC support, preserve my warranty, etc. just in case.
From all the flowmeter posts, I'm expecting to find *something* in there.
Posted: Mon Feb 11, 2008 9:32 pm
by Niko
Chris (bbqnut) is the master of brass shavings
There isn't a shaving this man didn't have in his Spaz so he's a great source for this kind of query.
I think it would be OK for you to take a gander at certain things in the machine without voiding any warranty we all do it to a certain degree.
It's not like you're going to crank the side panels off with a crowbar and use "other" tools for fixin' things.
Posted: Mon Feb 11, 2008 10:13 pm
by jmcphail
Just nervous I guess, afraid of one thing leading to another ending in disaster or worse, death, dismemberment even and I'm only insured for both left feet!
The last espresso machine I owned was a lever La Pavoni, over 10 years ago - me using LaSpaz is like a caveman flying a helicopter :D.
Posted: Mon Feb 11, 2008 10:17 pm
by chas
Just like if you bought an Italian sports car, you are forced to become your own mechanic.
Posted: Tue Feb 12, 2008 8:46 am
by jmcphail
I'm the guy that had to wear a cast on his foot after changing his oil years ago... "curb" model jack stand, open door, foot on curb, rolling off the curb... PINNED!
I'm pretty sure I won't crush my foot fixing this flowmeter, though.
Two good doubles this morning, plenty of flushing and wiggling, no flowmeter alarm. The intermittent thing. Aaaargh!
By the way, Tim at CC mentioned that it's a good idea to alternate the use of the shot buttons, that they can wear out like any other touchpad. It sounded like a voice of experience, I appreciated the advice and took the hint.
Posted: Sat Feb 16, 2008 12:10 am
by jmcphail
I was able to replace the flowmeter chip fairly easily. Although I completely removed the flowmeter to take it apart and inspect the inlet and outlet, it wasn't really necessary to do so simply to change the chip.
I didn't find any debris in the inlet or outlet when I inspected it. If there was any, it's possible that I didn't spot it and it rinsed away.
I wasn't able to replace the impeller, which looks like a little paddle wheel with two magnets mounted across the diameter near the axle. I can tell where the impeller fits, down in the brass body of the flowmeter under the black plastic cover, but even with the 3 allen screws removed the cover wouldn't budge - I think there might be a gasket or something else extremely tight fitting, securing the cover to the brass body. I just didn't feel like forcing it.
I noticed a difference in the chips. The top of the chip has 3 contact ears that fit in the cap that is wired to the programming unit, and the bottom is filled with a green colored, semi-translucent epoxy-like material. Embedded in the epoxy and slightly under the surface is a small, dark square. I'm guessing that this square is a small coil, and when the impeller spins the two magnets pass by the coil, generating a current pulse that is measured for programming the volumetric dose. Anyway, in the chip that came out of my machine the small, dark coil was off center by quite a bit; in the replacement chip the coil seemed well centered.
Lesson learned - turn off the water to the espresso machine when you undo any tubing inside - it leaked a little, which I thought was normal, but several towels later I realized what was going on.
I've pulled about 20 shots of various kinds, with both dose buttons, and no damaged flowmeter alarm. I'm going to run it all day tomorrow and see how it goes, and call CC Monday morning to discuss it. Maybe they know the secret of replacing the impeller, or maybe it isn't even necessary.
So, guardedly, I'm optimistic about the success of this repair. :D
Posted: Sat Feb 16, 2008 9:40 am
by jmcphail
8-10 more pulls later - 2 doubles plus various pre-warming and post-flushing & wiggling - still no damaged flowmeter alarm. I'm feeling better and better :D
Posted: Sat Feb 16, 2008 6:25 pm
by eprolix
chas wrote:Just like if you bought an Italian sports car, you are forced to become your own mechanic.
An apt analogy...my dad once owned a Fiat.

Posted: Sat Feb 16, 2008 9:38 pm
by JohnB
Considering the shop rate at most dealers these days being your own mechanic is a necessity not an option. I've owned many Italian motorcycles & currently have two Alfas but I installed a drive on lift in one of my shop buildings 4 years ago so I could service all our vehicles. Its more then paid for itself in that time & allows me to drive interesting cars that would break me if I had to take them to a dealer. Our local Nissan/GMC dealer gets $100 per hour, I don't even want to know what it would cost to take our bimmers into a dealer.
Posted: Tue Feb 19, 2008 8:52 pm
by bbqnut
jmcphail wrote:8-10 more pulls later - 2 doubles plus various pre-warming and post-flushing & wiggling - still no damaged flowmeter alarm. I'm feeling better and better :D
Those 3 allen heads should come out, you just need a good set of ball end allen wrenches. And if that doesn't do it, get one of those "Socket" allen wrenches - tight clearance and major torque.
For the record, I did it with some cheapie allen wrenches that didn't even have a ball end. And that is exactly where I found one of the brass shavings. I highly recommend getting in there, if for no other reason - peace of mind.
Posted: Tue Feb 19, 2008 11:27 pm
by jmcphail
The 3 allen bolts came out without a problem. I couldn't get the black cover off of the brass body of the flow meter, though. I tried slipping a knife blade into the seam and prying, but it need more persuasion than I was willing to apply - it felt like I was going to break the cover, so I just replaced the chip and put it back together.
I did run plenty of water through the flowmeter, though - both when I had forgotten to turn off the main supply ( cough cough ) and later in the sink by trickling into the inlet.
Do you recall any difficulty removing the black cover of the flowmeter, or a trick to it?
Posted: Wed Feb 20, 2008 2:15 pm
by bbqnut
jmcphail wrote:The 3 allen bolts came out without a problem. I couldn't get the black cover off of the brass body of the flow meter, though. I tried slipping a knife blade into the seam and prying, but it need more persuasion than I was willing to apply - it felt like I was going to break the cover, so I just replaced the chip and put it back together.
I did run plenty of water through the flowmeter, though - both when I had forgotten to turn off the main supply ( cough cough ) and later in the sink by trickling into the inlet.
Do you recall any difficulty removing the black cover of the flowmeter, or a trick to it?
The black piece attached to the brass body does not need to come apart, but in the photo here...
http://www.s1cafe.com/viewtopic.php?p=5259#5259
...you only care about getting part 2498 out and fully inspecting and washing it (it is the brass housing with the impeller). That is where the shavings would be. And if you in fact got the 3 allen head screws off, as well as the two underneath and the two brass compression fittings - it will be in your hands, all ready to inspect.
Posted: Wed Feb 20, 2008 5:15 pm
by chas
Without taking the covers off and looking for myself, I don't know if this is a dumb question or not. So far two machines and four years and this is one of the few things I haven't had to disassemble at some point.
If you don't need to take the cover off why do you need to remove the 3 allen screws. It looks like all they do is hold the cover on but I am guessing they must connect to something else as well???
Posted: Wed Feb 20, 2008 7:00 pm
by bbqnut
I don't have my S1 anymore, but using the photos as a guide...
The brass piece is where the water flows through (but there are 2 pieces - top and bottom).
The 3 allen head screws hold the top part of the brass piece to the bottom piece.
The entire brass body is held to the frame with the bottom two screws.
So I would get the whole thing out (removing the bottom 2 screws).
Once out, then remove the 3 allen heads from the top, which will then open the brass body into 2 pieces, and allow you take out the impeller, and to check the orifices carefully for shavings.
The black piece I do not think is relevant to the shavings issue. Leave it alone, unless there is an obvious way to remove it.
Does that make sense?
Posted: Wed Feb 20, 2008 7:12 pm
by jmcphail
The allen bolts hold on the black cover, but the black cover is also pressure or snap-fitted, or has a gasket or something else that fastens it to the brass body.
The two bottom screws fasten the brass flowmeter body to the bottom plate of LaSpaz's chassis.
Are you saying the brass body of the flowmeter comes apart? It looks like one piece to me, unless I missed something.
It's necessary to remove the black cover to replace the impeller.
Posted: Wed Feb 20, 2008 7:36 pm
by bbqnut
jmcphail wrote:The allen bolts hold on the black cover, but the black cover is also pressure or snap-fitted, or has a gasket or something else that fastens it to the brass body.
In my photo, you will see that the 3 allen heads hold a brass "top". It is positioned between the black cover and the brass "bottom".
I think a photo of yours is in order...
I have attached how I remember it in this little drawing.
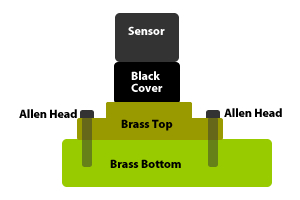
Posted: Wed Feb 20, 2008 8:21 pm
by jmcphail
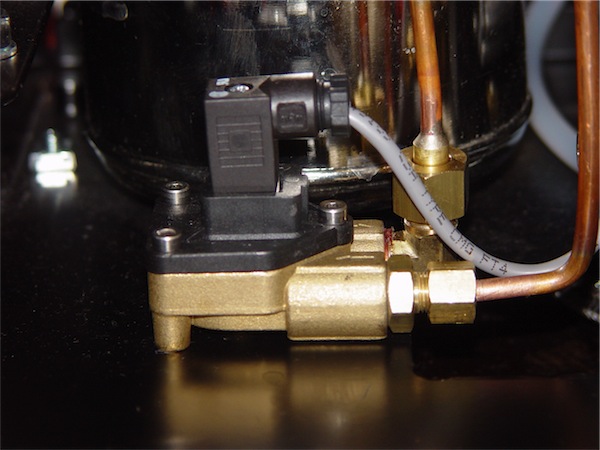
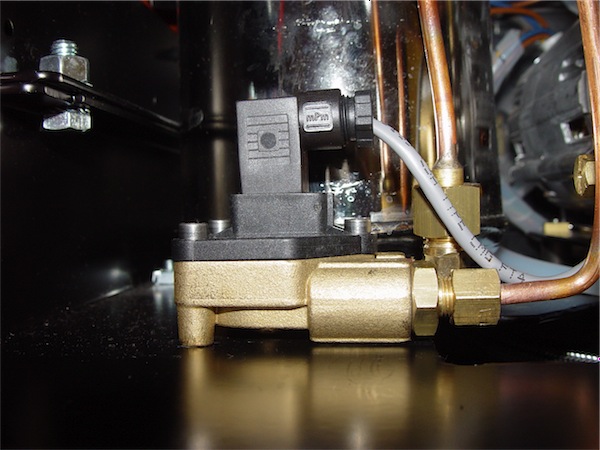
Two photos, one a slightly different elevation of the other. Maybe they are using new flowmeters? IIRC, when I had it out to replace the chip I noticed "Gicar" printed on it.
Pardon the obnoxious flash, that boiler is really reflective...
Posted: Wed Feb 20, 2008 8:43 pm
by chas
Damn, that's one clean machine!
Posted: Wed Feb 20, 2008 8:43 pm
by bbqnut
Yep they changed it.
Just see the attached photo.
In any case, I would remove the whole thing and carefully inspect and wash all orifices.
Posted: Thu Feb 21, 2008 2:21 pm
by Niko
chas wrote:Damn, that's one clean machine!
Yeah, no kidding - I was nearly blinded by the cleanliness
Posted: Thu Feb 21, 2008 4:04 pm
by jmcphail
...and to think I was embarrassed by the water spots on the steam boiler.