Page 1 of 1
S5 Steam Arm Photos
Posted: Wed Jan 14, 2009 11:10 pm
by Endo
Got the S5 steam arm today. Installed very quickly using a 22mm open end wrench. A small concave fitting that mates on top of the ball and a spring also fell out. I think there is an o-ring in there too, but I didn't see it (stuck inside maybe?)
Took a few blasts into a cup and found lots of little metal filings at the bottom....so be warned,
don't make a drink with the first blast.
The ball swivel seemed a bit smoother than the original arm so new new S5 arm feels a bit more loose. Not bad, just a little different. Still stays in place when put in any position.
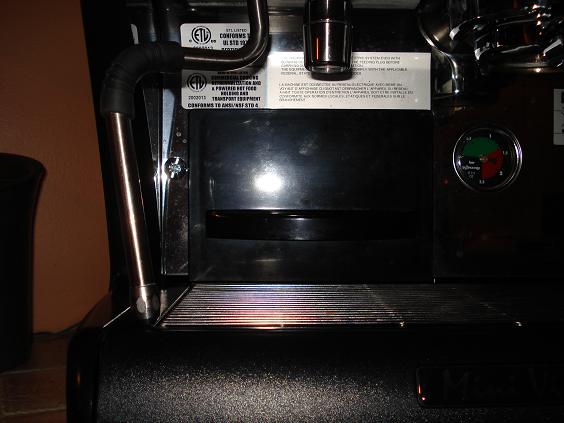
The arm is long enough that it does not move over the drip tray grill when push from left to right in the standard way. This was a bit of a concern for me since I like to blow out the water before I froth. After a bit of playing, I found you can get it over the grill but you need to move it in a different path. Have a ,look at the photos an you'll see.
The 4 hole .9mm tip works great. Mine originally came with the 3 x 1.3mm European tip. This was WAY to powerful for a 10oz pitcher used to make a single Latte. The new 4 hole tip is less powerful and produces much better and longer lasting microfoam (see Rosetta photo below). I think holes just a tiny bit bigger (4 x 1mm) would be perfect, the the 4 x 0.9mm comes pretty close to ideal.

- Original short wand with 3 hole tip
- s_DSC01092.jpg (51.6 KiB) Viewed 27457 times
- S5 arm moved sideways
- s_DSC01093.jpg (48.22 KiB) Viewed 27457 times
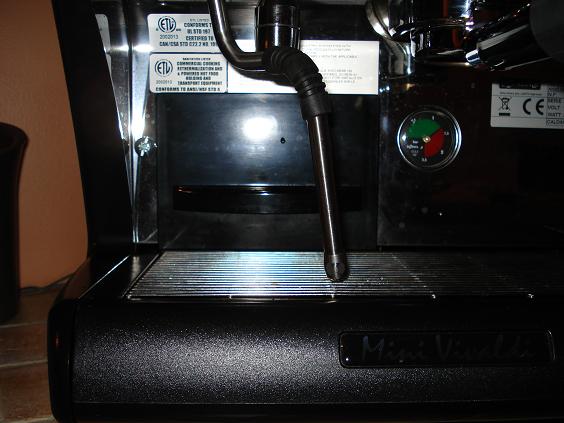
- S5 arm twisted to fit over grill
- s_DSC01094.jpg (52.61 KiB) Viewed 27457 times

- Rosetta with new S5 wand
- s_DSC01096.jpg (46.81 KiB) Viewed 27457 times
Re: S5 Steam Arm Photos
Posted: Thu Jan 15, 2009 7:43 am
by chas
Damn, look at all the stickers LaSpaz is plastering all over the machine these days. The only thing missing is one that says, "If this machine's a-rockin", don't come knockin'"!
Re: S5 Steam Arm Photos
Posted: Thu Jan 15, 2009 9:31 am
by Endo
chas wrote:Damn, look at all the stickers LaSpaz is plastering all over the machine these days. The only thing missing is one that says, "If this machine's a-rockin", don't come knockin'"!
Yes. Damn ETL.

I have the French and English ETL stickers since I'm in Quebec. That's why one of my first posts here was callled "sticker removal". But to be honest, unless you have your head under the machine looking at you bottomless PF pour (or have 6 inch long legs), you don't really see them. So I left them on for now.
They'll all be gone when I replace my front panel for the dual manometer mod!!

Re: S5 Steam Arm Photos
Posted: Thu Jan 15, 2009 9:41 am
by JohnB
chas wrote:Damn, look at all the stickers LaSpaz is plastering all over the machine these days. The only thing missing is one that says, "If this machine's a-rockin", don't come knockin'"!
Mine came with only one sticker on the front cover & it was gone within a few days.
Re: S5 Steam Arm Photos
Posted: Thu Jan 15, 2009 9:46 am
by JohnB
The pivot will tighten up with use, mine was pretty loose when I first installed the S5 wand. The mounting point is higher on your Mini then on the S1. Mine won't fold in facing left like you show in your first pic but it tucks in nicely facing right. I like the S5 arm but have been thinking about putting it in my tubing bender & kicking the lower portion in a bit.
Re: S5 Steam Arm Photos
Posted: Thu Jan 15, 2009 9:57 am
by Endo
I'm not hugely impressed with the S5 arm. I found the 4 hole .9mm tip made a big difference and improved my microfoam over the 3 hole 1.3mm I had originally, but the longer arm difference was minor in my opinion. I guess if you use a 20oz pitcher, you need all the extra lnegth you can get, but with a 10oz pitcher, the tip swap is enough.
Re: S5 Steam Arm Photos
Posted: Thu Jan 15, 2009 10:16 am
by chas
Most guys like the extra length, whether it's needed or not!

Re: S5 Steam Arm Photos
Posted: Thu Jan 15, 2009 10:31 am
by JohnB
chas wrote:Most guys like the extra length, whether it's needed or not!
True. I can't recall ever hearing anyone complain about their wand being too long.
Re: S5 Steam Arm Photos
Posted: Thu Jan 15, 2009 11:28 am
by Endo
JohnB wrote:chas wrote:Most guys like the extra length, whether it's needed or not!
True. I can't recall ever hearing anyone complain about their wand being too long.
Yes, but this one is so long it can't even be tucked back in.

(I won't comment on the "4 hole tip").
Re: S5 Steam Arm Photos
Posted: Thu Jan 15, 2009 7:25 pm
by Endo
chas wrote:Damn, look at all the stickers LaSpaz is plastering all over the machine these days. The only thing missing is one that says, "If this machine's a-rockin", don't come knockin'"!
All stickers now removed. Came off a lot easier than I thought. Just get a fingernail under a corner and pull.
Re: S5 Steam Arm Photos
Posted: Fri Jan 16, 2009 3:04 pm
by Endo
Here's a video of the new S5 steam arm and 4 hole .9mm tip I added to my Mini.
http://www.youtube.com/watch?v=-Vbb9Acws34
Re: S5 Steam Arm Photos
Posted: Fri Jan 16, 2009 3:24 pm
by JohnB
What, no music??
Re: S5 Steam Arm Photos
Posted: Sat Jan 17, 2009 11:49 am
by NewEnglandCliff
Did I spot an Omega Seamaster?
Re: S5 Steam Arm Photos
Posted: Sat Jan 17, 2009 12:24 pm
by chas
Checking out his watch, eh?
Re: S5 Steam Arm Photos
Posted: Sat Jan 17, 2009 2:16 pm
by NewEnglandCliff
Another hobby I can't afford.
Re: S5 Steam Arm Photos
Posted: Sat Jan 17, 2009 7:01 pm
by David23
NewEnglandCliff wrote:Another hobby I can't afford.
Ditto.
Re: S5 Steam Arm Photos
Posted: Wed Jan 01, 2014 1:16 pm
by Cu$hman
Hey... the video is no longer available?
Re: S5 Steam Arm Photos
Posted: Wed Jan 01, 2014 1:45 pm
by chas
Nothing to be done about that since the video isn't hosted here and Endo has dropped out. At least the still photos are still there at the bottom of this thread.
Re: S5 Steam Arm Photos
Posted: Tue Jan 20, 2015 9:35 am
by Firochromis
Hi, I'll order S5 arm which I believe is the part #7833. In Spaziale pdf's I found this part to NOT including part #7651, which seemed e necesity to me. So do we need the part #7651 ordered separately to fit an S5 arm to an S1? Or alternatively can we rotate the part #218 counter-clockwise so that the steam path of that Tee looks directly below? Ok, a photo will help:

I marked the #7651 with a red circle and #218 with a blue rectangle.
Re: S5 Steam Arm Photos
Posted: Tue Jan 20, 2015 10:02 am
by chas
If you have the truly original steam arm that came with the very earliest S1's, then you have the one pictured in the upper right of the photo. If you have that one you can tell because it only moves in one direction. This was replaced very early on by a ball joint version that can pivot in any direction. The difference between this model and the S5 arm is that the S5 arm is 1-1.5" longer.
So the bottom line is that if you already have a ball joint arm you do NOT need any parts other than what LaSpaz indicates they are sending you. HOWEVER, if you really only have the version that swings in and out, then you do need that part.
Re: S5 Steam Arm Photos
Posted: Tue Jan 20, 2015 10:23 am
by Firochromis
Thank you Chas, I have the #7546 arm, seen at the upper right corner. Soo, more parts to order :)
Re: S5 Steam Arm Photos
Posted: Tue Jan 20, 2015 10:58 am
by chas
In that case let me run one more thing by you to keep a look out for. I had one of the very first S1 machines around and also the first one to upgrade one to the S5 arm. (Initially they provided the S5 arm to replace the old arm. Only later did they create a shorter S1 arm version.)
Each of these machines is slightly different since they are handmade so maybe yours will not have this issue (but it probably will!). When I got my new arm all installed the left side cover would not go back on because there was a small area where it interfered with the new steam arm assembly. I had to cut a small section off the cover, then all was fine. The area that got cut does not show when the cover is in place. I think they later changed the cover design to prevent this interference. Good luck.
Once you have this machine the way you want it you'll have so much experience that I can retire and turn the S1Cafe over to you!
Re: S5 Steam Arm Photos
Posted: Tue Jan 20, 2015 3:24 pm
by Chura
chas wrote:
Once you have this machine the way you want it you'll have so much experience that I can retire and turn the S1Cafe over to you!
Re: S5 Steam Arm Photos
Posted: Tue Jan 20, 2015 5:33 pm
by Firochromis
chas wrote:In that case let me run one more thing by you to keep a look out for. I had one of the very first S1 machines around and also the first one to upgrade one to the S5 arm. (Initially they provided the S5 arm to replace the old arm. Only later did they create a shorter S1 arm version.)
Each of these machines is slightly different since they are handmade so maybe yours will not have this issue (but it probably will!). When I got my new arm all installed the left side cover would not go back on because there was a small area where it interfered with the new steam arm assembly. I had to cut a small section off the cover, then all was fine. The area that got cut does not show when the cover is in place. I think they later changed the cover design to prevent this interference. Good luck.
I've seen that article in the S1V1 pages about cutting the side panels. Well, I made custom wood panels for my unit, so this cutting part will be a little more difficult but I'll make it.
chas wrote:Once you have this machine the way you want it you'll have so much experience that I can retire and turn the S1Cafe over to you!
Oh no, please don't do it :)